Contribution Guidelines
I. Coding convention
Coding style setup
DaisyKit follows Google C++ Style Guide (opens in a new tab) with some exceptions:
- Source code file names:
.cppfor source file and.hfor header files.
Coding convention for the code base should be formatted and checked by clang-format (opens in a new tab). Configuration file .clang-format for code formatting can be found here (opens in a new tab).
Setup for Visual Studio Code (VS Code)
VS Code can use clang-format to format source code file (Ctrl+Shift+i).
- Install Clang-Format extension in VS Code: https://marketplace.visualstudio.com/items?itemName=xaver.clang-format (opens in a new tab).
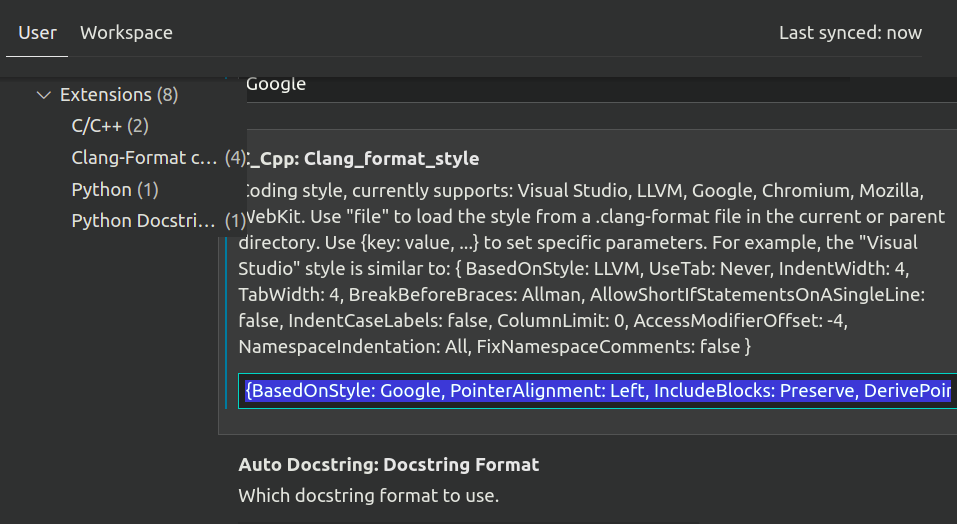
- Configure
C_Cpp:Clang_format_styleas following:
{BasedOnStyle: Google, PointerAlignment: Left, IncludeBlocks: Preserve, DerivePointerAlignment: false}
Run code format for the whole project on Ubuntu (should be done before committing your code):
bash scripts/format_code.shComments
- Use
//to start a comment. This project use Doxygen to generate documentation automatically. Use///to start a comment that should be used to generate documentation. - Add license to all
.hand.cppfiles like below example.
Example:
// Copyright 2021 The DaisyKit Authors.
//
// Licensed under the Apache License, Version 2.0 (the "License");
// you may not use this file except in compliance with the License.
// You may obtain a copy of the License at
//
//      http://www.apache.org/licenses/LICENSE-2.0
//
// Unless required by applicable law or agreed to in writing, software
// distributed under the License is distributed on an "AS IS" BASIS,
// WITHOUT WARRANTIES OR CONDITIONS OF ANY KIND, either express or implied.
// See the License for the specific language governing permissions and
// limitations under the License.

#ifndef DAISYKIT_GRAPHS_CORE_NODE_H_
#define DAISYKIT_GRAPHS_CORE_NODE_H_

#include "daisykit/common/types.h"
#include "daisykit/graphs/core/connection.h"
#include "daisykit/graphs/core/node_type.h"
#include "daisykit/graphs/core/packet.h"

#include <atomic>
#include <chrono>
#include <map>
#include <memory>
#include <string>
#include <thread>

namespace daisykit {
namespace graphs {

/// A node is a processing unit which handle a task such as inferecing a model,
/// running an image processing operation, or visualizing data.
class Node {
 public:
  /// Node constructor. Passing a name and node type here.
  /// Synchronous nodes (kSyncNode) processing function Tick() is activated by
  /// the previous node, which means all processing pipeline runs node by node.
  /// Asynchronous node (kAsyncNode) has a processing thread inside to run
  /// processing Tick() in a loop. Thus, these node can run paralelly.
  Node(
      const std::string& node_name,  /// Node name
      NodeType node_type =
          NodeType::kAsyncNode  /// Node type / operation mode.
                                /// NodeType::kSyncNode for synchronous node,
                                /// NodeType::kAsyncNode for multithreading node
  );

  /// Activate a node. This function create and activate processing thread for
  /// asynchronous node.
  void Activate();

  /// Feed data to a node. This function can be used to feed data to the input
  /// node of a graph, where there is no connection in.
  void Input(const std::string& input_name, PacketPtr packet);

  /// Add an input connection to the node.
  /// Input connections are used to get input to this node.
  void AddInputConnection(std::shared_ptr<Connection> connection);

  ...

  /// Virtual method for processing data, needs to be implemented by derived
  /// classes. This method checks and gets all required data, processes data and
  /// outputs to out connections.
  virtual void Tick() = 0;

  /// Getters for node info
  std::string GetNodeName();
  NodeType GetNodeType();

 protected:
  /// Prepare all needed input as a map for processing function.
  void PrepareInputs(std::map<std::string, PacketPtr>& input_map);

  /// Publish outputs to output connections.
  void Publish(const std::map<std::string, PacketPtr>& outputs);

 private:
  /// Worker thread for each node.
  /// This thread runs Tick() function in a loop
  void WorkerThread();

  /// Start processing thread.
  std::thread SpawnWorker();

  std::atomic<bool> is_activated_;
  std::thread worker_thread_;
  std::string node_name_;
  NodeType node_type_;
  std::vector<std::shared_ptr<Connection>> in_connections_;
  std::vector<std::shared_ptr<Connection>> out_connections_;
  std::thread processing_worker_;
};

}  // namespace graphs
}  // namespace daisykit

#endif
II. Contribution flow
- Create a separated branch for each task.
- Suggested naming for git branch:
- For a new feature:
feature/example - Code refactoring:
refactor/example - Bugfix:
fix/example
- For a new feature:
- The development flow should be:
Create a new branch for development => Write some code => Test your new code => Create a pull request to master branch and add your teammates to review => Revise if needed => A teammate approves and merges your pull request after all reviewer approved.III. Contribute to DaisyKit SDK
Create a pull request to https://github.com/nrl-ai/daisykit (opens in a new tab). Visit repository for the setup instructions.
Next tasks: Build model training code, inference code, design and build flow architecture, write documentation and tutorials.
IV. Contribute to DaisyKit Android
Create a pull request to https://github.com/nrl-ai/daisykit-android (opens in a new tab). Visit repository for the setup instructions.
Next tasks: Build wrappers for Kotlin, Java and example applications.
V. Contribute to Daisykit iOS
Create a pull request to https://github.com/nrl-ai/daisykit-ios (opens in a new tab). Visit repository for the setup instructions.
Next tasks: Build base app, wrappers for Swift, Objective-C and example applications.